12.30.2011

Heavy Metal.

Thinking about mixing it up for NYE and using some hardware in my hair. Usually we opt for hiding our grips when creating styles with our hair, but after seeing these images on www.thebeautydepatment.com I think I might try using my grips as an accessory rather than a necessity!


I have always been a fan of embellished clothing so lets see how the embellished hair goes down!

Chanel

Holly and the Ivy.

With today and tomorrow the last chance to really pull of your Christmassy style make up looks until next year why not try a green lid with red lips. This may sound horrible but it works really well if you pair a bold strong red with a light green lined lid. The look below was from Jil Sander's Fall 2011 shows.


This look just isn't for Christmas either as Dior used it in their Spring 2012 catwalk shows, just mixing up the tones used gives it a more summery and fresh feel.


Hold on to that festive feeling for the final few days!!!!!  

12.29.2011

Earring Etiquette.

Sometimes I find it a real struggle to decide how to wear my hair with certain types of earring so that it doesn't look like I have too much going on in the shoulder/face area!

Kate Bosworth is always accessorised well with beautiful hair when on the red carpet, giving her a Bo-ho chic air. So I had a little nose on her website www.jewelmint.com and found this post giving Kates top tips on how to style your hair to make the most of your earrings, I will be taking note to this when doing my hair for the big New Years Eve! 

12.22.2011

Colour Code.


I personally love the dip dye hair look but if you were wanting an alternate look and are feeling brave this style that I found in Vogue Taiwan is a great option!

Using the different colours really makes the hair style individual and it can be as bright or as subtle as you like by varying the colours used and the amount you put in your hair.
Despite my love for this look it might not be wearable on a daily basis especially in the office, therefore clip-in hair extensions would be fantastic for achieving this. You also would have to carefully consider the colours you chose as you don't want any outfit clashes or colours that are unflattering on your skin!

Think I may have to do so sometime soon...just first to chose the colour/colours!

12.21.2011

Festive Fingers.

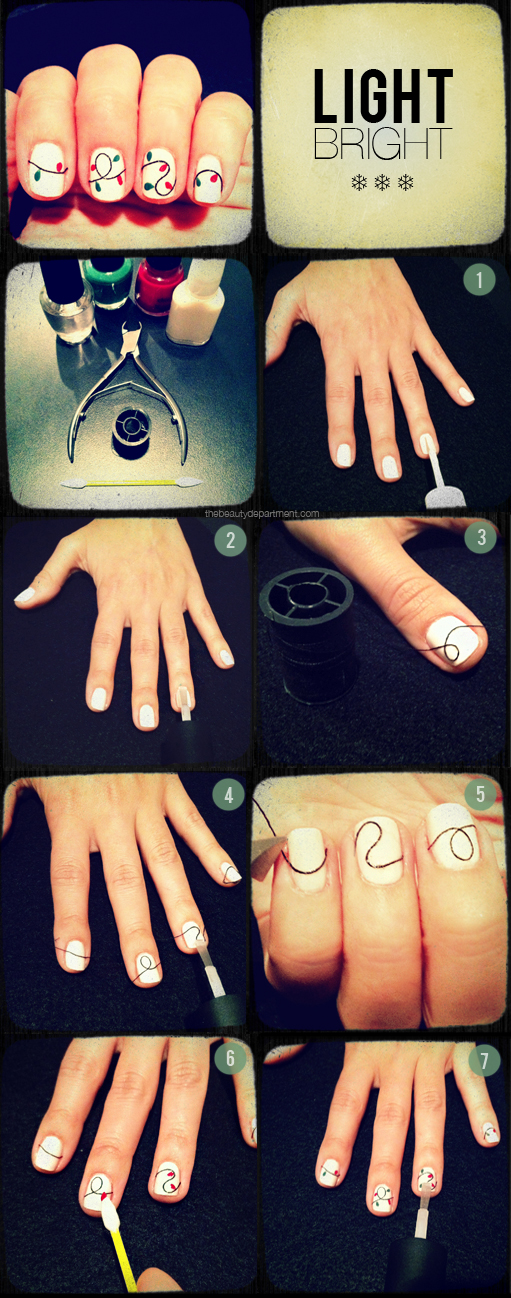
After posting about festive finger nails last night I had a look on the web at some other ideas people had and I found this idea for a Christmas light style, a bit more difficult to do but a great alternate idea to the usual glittery, Santa or red nails we see!

I found this post on www.thebeautydepartment.com. Let me know what you think!


NAILED IT!


Photos + post design by Kristin Ess
While you’re all probably busy decking the halls right now, perhaps you’ll be able to take a break to get fancy, festive + fun with this manicure tutorial from Lady Conrad! She wanted to string some lights across her nails and so she did… Literally! Here’s how she created these lil’ cuties:
TOOLS: base & top coat, green polish & red polish (you can use any colours you want), white or off-white polish, cuticle nippers or small scissors, black cotton string, a small brush or pointed q-tip.
STEPS:
  1. On clean nails, do a solid coat (or two thin coats) of white or off white polish.
  2. After the white polish dries, do one clear coat. The string will adhere to this so make sure it’s not too fast drying or too thin of a coat.
  3. Drape black string over the nail and let it loop as you see Lauren doing in the photo. Cut the string about 1/2 inch longer on each side of the nail. Don’t trim it down yet.
  4. Add a thin clear coat on top of the string to secure.
  5. Once that dries, trim the string down using cuticle nippers or small pointy scissors.
  6. Next is the fun part– adding your lights. Pick any colours you want!
  7. Last, do one coat of a quick drying clear polish.